Tuesday, June 22, 2021

Atmel ATF1504AS(L) CPLD Development Board - Part 9 - DIP 14 and 16

After replicating the function of a 74HC00 in part 8, I became a little obsessed with creating a programmable CPLD that would fit a DIP format.  So after a little bit of playing about in DipTrace I came up with this.

I created two versions, a 14 pin version and a 16 pin version.  Both use the ATF1504AS(L) but in a TQFP package.  I also used 0603 SMD parts for the Capacitors and the Resistors, which although they are tiny, aren't too bad to solder on by hand. Just make sure you use Flux.

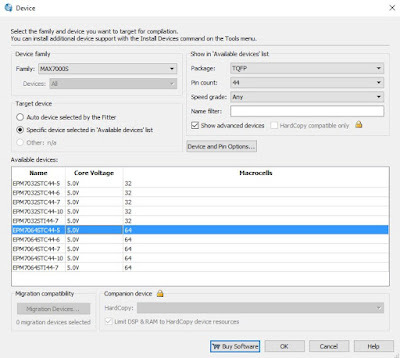
Because the PLCC and TQFP have different pinouts I first needed to find the correct MAX product to write for.  I am using the ATF1504ASL-25AU44-T which translates to this part from the conversion guide.

So I'll copy the existing project and set the part to EPM7064STC44-5.

 
I will also need to change the pins to match the new layout


Now I upload it as a 1504ASL ** NOTE the "L"

I had to make special jig to program the CPLD as used 1mm pitch not 1.25mm.

Here is the comparison between the 74HC00 and the CPLD.


 Here it is working just fine in my Z80MBC.


Friday, June 4, 2021

Building the : Cart64out by Sven Petersen ( kits available )

I've been looking at cart breakouts for quite a while now, but I've not had the skills or equipment to warrant one, that is, until now.  I recently bought and started using a Digital logic probe from Kingst and it it is a wonderful piece of kit.

So with my Kinst probe in conjunction with Sven's cart I am now looking at two more projects:

    1) Cart repair : I have two carts that I need to repair, both of which seem to be fine, but just don't work.

    2) Cart design : I'd like to try my hand at building a cart with a CPLD or FPGA.

Anyhow this build was pretty simple but I think It's going to be really handy.  The parts themselves are readily available apart from the cart edge connector, luckily the vendor was pretty good and I got a personalized deal for 30 units.  This is fine as I'll use them for board repairs and I may sell a few.

This is a bit of a niche project, I have quite a few spare boards and parts.

If you're in Australia and would like one please get in contact with me.  If you're outside of Australia, it's probably not worth while due to postage costs. 

The cost is $30 (AUD) for a full unassembled kit which includes:

  • 1 x PCB
  • 1 x edge connector
  • 1 x 40 pin connector
  • 1 x 18 pin header ( you can remove the 5v and GND pins if you wish like I have )
  • 1 x momentary switch
  • 1 x resistor network
  • 2 x standoffs
  • 2 x screws
  • 7 x jumpers
  • Standard Tracked parcel post to anywhere in Australia

I'm probably losing money on this I'm too scared to do the sums and find out, but it would be cool to see them other peoples hands.


Thursday, May 13, 2021

Repair : Commodore 128 blackscreen repair - part 2

This is a continuation of the Commodore 128 blackscreen repair.

Ohh Ohhhhh . . . We're half way there . . . 

Just before I started recapping the C128 I suddenly had a thought. I had only run the C64 diagnostics, was that really enough? 

It turns out that the C128 mode of a C128 does not check it's memory on startup and the C64 dead test cartridge only tests the 64K of RAM in the LOW Bank and ignores the HIGH Bank.

However do not fear there is also a C128 dead test cart available.  I went to the World of Jani and downloaded an image from the collection he has amassed in this awesome blog post : Diagnostic Carts and Manuals.

Making a C128 diagnostic cart

I downloaded a cart from from the World of Jani on to a 8K EPROM 27C64 and tried it with one of the many VersaZif64 carts that I had made quite a while ago.

No matter what I tried I could not get it to work.  I read Jani's blog on making C128 carts and decided that even though the ROM image was only 4K, a 16K cart was probably required for it to work.

So I tried using the 785260 image on a 16K EPROM 27C128 and it worked first go.  For the VersaZif64 cart you need to set the all DIPs to OFF and then turn the selector to 16K

Where's the rest of the RAM?

Running the C128 Diagnostic Cart it brought up the unseen memory issues lurking in the background.
** You can ignore the other errors, I do not have a test harness installed. **
 

I tried putting RAM dips over the existing dips and it didn't change.  Then I replaced both U46 and U47 and it still did not change.  That's really weird.  I thought maybe the Diag Cart is wrong so I downloaded memtest64 from this article.  However it also told me there was a memory issue.  Interestingly when I loaded it, it would sometimes just start the machine code monitor and on one occasion the  Diagnostic Cart also started the Machine Code monitor when it was running.

This is one of the symptoms of the C128 Kernel ROM being bad ( the low one I think ).  I pulled both the High and Low Kernel ROM's, tested them and they were both completely fine.

My next thought was that one of more of the logic chips had failed.  There are a lot of chips so I thought I'd probe around with my Oscilloscope to try to find the culprit, rather than just trying pot luck replacing the chips one by one.
 
However in the end it was just bad RAM and I replaced the entire high ram bank and it fixed the issue.

Recapping

I find it a chore looking at the motherboards to get a parts list for recapping.  Luckily there's always someone whose compiled a list already ( and may even sell you kits ).

I used the parts list from here https://console5.com/wiki/Commodore_128 but I sourced the caps myself as I wanted to do quite a few machines.

The caps in the machine overall looked in pretty good condition, until I popped open the shielding on the video chips.  One of the caps had a nasty burn mark on it.


Wednesday, April 14, 2021

The risk of buying chips online

 So far I’ve been pretty lucky buying chips from the internet but recently ( 2021 ). I have had two bad purchases on AliExpress.

The first purchase was 2 x 6510 CPU’s. This was a pretty easy dispute as one of the chips was broken in half and the other was dead.  This dispute was very quickly and easily resolved. 

On the second dispute I got scammed by a very schrewed and dishonest trader.  So I am going to document my lessons learned here for dealing with fake chip disputes on AliExpress. 

So here goes . .

When opening a dispute with AliExpress you need to document your dispute fully. 

1) take photos of the product front and back

2) take photos of the packaging front and back including all packing material

3) take SHORT videos of you testing the item as clearly as you can showing the item not working. 

4) write your issue in detail in full

5) when logging the issue only do "full refund no return"

6) do not engage the vendor if they try to get you to return the item.   Let AliExpress deal with them. 

I learnt a very hard lesson from this vendor and lost a lot of money. So in full disclosure I’m going to put it here.

I do not recommend buying from Liheng at Aliexpress.  Please note that they have a number of shop fronts such as Liheng1 and Liheng2 . . etc etc.  I suspect this is so they can cycle through thier stores to clean out negative feedback.


Saturday, March 27, 2021

Atmel ATF1504AS(L) CPLD Development Board - Part 8 - Replacing Logic 74HC00

Time to experiment with replacing Logic chips.  This time I am going to replace a 74HC00 on a Z80-MBC2 board.

It's important to review not only the data sheet for the 74HC00, but also the Z80-MBC2 to ensure that it is appropriate.  For this experiment everything is running at 5Volts so it is safe to proceed.

You don't need a Z80-MBC you can just connect A and B to the VCC and GND lines in combinations and the Y lines to some LEDs.

However I wanted to see if it would work in a REAL system.

You can go to Hack a Day to learn more about the Z80-MBC.


74HC00 Datasheet

Let's first review the Datasheet, specifically we need to know how the 74HC00 operates and the pin out.  In this case it is very easy, there are four NAND gates in the DIP.
 
It should be strongly noted that we are implementing LOGIC only with the CPLD.  Some Logic chips have built in electrical characteristics that can not be replicated by the CPLD


Replicating the 74HC00 in Verilog

Now it's time to replicate the 74HC00 in Verilog.
As you can see on the image above there are Four NAND gates.
 
To save time having to type out each gate individually you can create an array of pins, the following declares 4 pins ( 0,1,2 and 3 ).
 
     input [3:0]  pinA
 
which is much better than this
 
    input pinA0    
    input pinA1
    input pinA3    
    input pinA4
 
Each gate has Two Inputs ( A and B ) and One Output ( Y ).
The Two inputs A and B are AND'ed togther and then the result is NOT'ed ( reversed ).
 
    Y = NOT ( A AND B )
 
In Verilog this is as follows where x is the pin number in the array.
 
    assign y[x] = ! ( a[x] & b[x] ) 


Let use also allocate the pins in a logical way in the Pin Planner.


Hooking it all up

Finally let's hook it up to the Z80-MBC2.  It is a bit tight for space so take your time with the wires.  I am using the Z80 to power the CPLD via pins 7 GND and 14 VCC.

Without the 74HC00 installed the computer stops at the line" IOS: Z80 is running from now".

It lives, the user prompt is ready and waiting for action.